Table of Content
A motorcycle must have reliable braking to ensure you can slow down and stop safely. Reliable braking ensures you maintain control of your motorcycle. You can maneuver your motorcycle with confidence if it has adequate braking power. Most modern motorcycles are bulky and gain momentum while riding at high speeds, requiring more time and room to stop without wobbling. Unfortunately, brakes undergo excessive wear and tear due to sliding against moving parts when applied. Due to constant heavy-duty operation, brakes require regular service and maintenance to remain functional without failing. Read this article to learn about motorcycle brake service and maintenance.
1. How a Motorcycle Brake Works
Most motorcycles are fitted with hydraulic disc brakes. Brakes are complex machinery with multiple parts, including discs/rotors, calipers, brake pads, pistons, and levers. They operate based on Pascal’s law, which states:
“Any force applied to a confined fluid is transmitted uniformly in all directions throughout the fluid regardless of the shape of the container.”
When the brake lever is pressed, the small piston installed near the lever exerts pressure on the fluid, which transfers to the other piston attached to the wheel near the brake rotor. The large piston attached to the wheel exerts a greater force on the brake rotors/discs through the brake pads to stop the wheel.
Below is the equation that uses Pascal’s law:
P1 = P2
F1/A1 = F2/A2; Pressure = Force / Area
Pressure is denoted by P, force is denoted by F, and area is denoted by A. The A1 is smaller than A2 and the F2 must be greater than F1 to ensure that both values are equal. Even a small force applied to the brake lever multiplies and creates a greater force at the large piston that causes the brake pads to press against the rotors.
2. 101 Guide on Motorcycle Brake Service and Maintenance
2.1 Cleaning Motorcycle Brakes
The most basic aspect of brake service and maintenance, cleaning motorcycle brakes can help improve their performance. Dust and mud accumulated on the brake pads, calipers, and rotors can cause rusting and abrasions, resulting in more friction and early wear and tear in the brake components. If you ride a dirt bike, the motorcycle brakes will wear out quickly if you do not clean them regularly.
Note: To keep your motorcycle’s brake components clean of grease, do not over-lubricate the chain.
There are several brake cleaner products available on the market you can use to clean the brakes. However, you should read reviews and customer feedback before you buy a cleaning product. Use a microfiber cloth to wipe off any dirt, mud, and debris on the brake components.
2.2 Inspecting Brake Components
The first step of motorcycle maintenance is to carefully inspect the motorcycle parts. Inspecting your motorcycle brakes can help you evaluate their condition and spot any potential issues. Due to the grinding motion and excessive friction produced between the rotors and brake pads when the brakes are applied, this generates excessive heat. Such extreme conditions can cause cracks, wear, cuts, fractures, and thinning in the brake pads that gradually cause them to become less effective. If your brake pads have passed their service life, they must be replaced. If your brake pads start producing irritating noises when the brakes are applied, this is a sign that they are close to expiring and must be replaced.
2.3 Regularly Inspect the Level and Condition of the Brake Fluid

To keep your motorcycle’s brakes working smoothly, the fluid must be applied to reduce friction between the sliding parts. Motorcycle brakes can wear out quickly if the fluid has gone bad or the fluid level is low. The fluid can become contaminated if it absorbs moisture. The brakes will not work without fluid as it helps exert the pressure required to push the pads against and stop the wheels from moving when the brakes are applied.
There are several ways you can check the condition and level of the brake fluid, including:
- You can check the fluid level by looking through the small window on the brake fluid container on your handlebars. While checking the brake fluid level, make sure your motorcycle is parked on its center stand. There is a mark on the window indicating the minimum level of the brake fluid. If the brake fluid level is below the minimum mark, you must refill it.
- To check the condition of the brake fluid, you can open the brake fluid container and look at the color of the fluid. If it has become dark, you should replace the brake fluid immediately.
- If you do not want to interact with the brake fluid container, you can simply test the fluid by pressing the brake lever. If the lever feels spongy and squeezes more while pressed, it may be due to bad brake fluid.
- For an accurate assessment of the brake fluid’s condition, get a brake fluid tester. To test the fluid, remove the cap, turn the tester on, and dip it inside the brake fluid. The lights on the tester will indicate whether the fluid is good or not.


2.4 Replace the Brake Fluid Using a Bleeding Kit
If you find the motorcycle brake fluid has gone bad or become contaminated, replace it with fresh fluid. You can replace the brake fluid at home or your garage by yourself if you have the following equipment:
Equipment Required
- DOT-4 brake fluid
- Rubber pipe/hose
- Small container
- Screwdriver
- Adjustable wrench
- Paper towels
- Microfiber cloth
Precautions
- Keep it clean
- Make sure the brake fluid does not touch the paint
Process
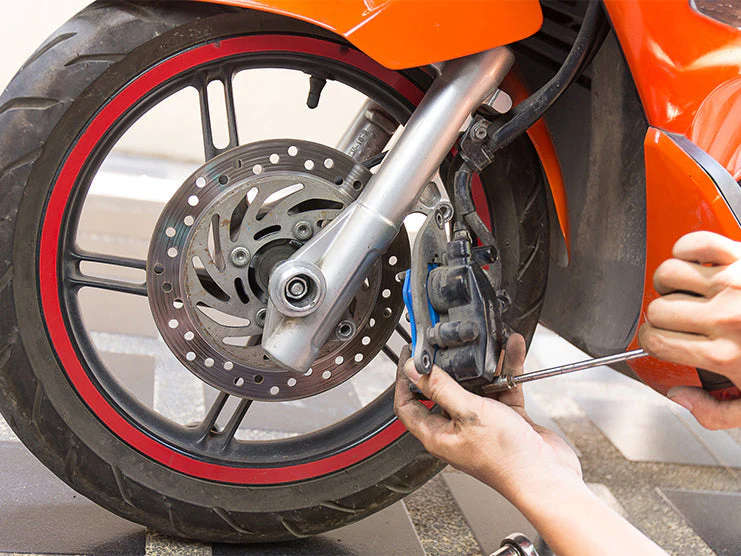
- Start by removing the dust cap on the caliper.
- Find the bleeder bolt and tighten it a little using an adjustable wrench.
- Place the rubber tube on the bleeder bolt. Make sure it fits and leaves no opening for brake fluid to leak out. Place the other end of the tube inside a container which you will dump later.
- Before you open the brake fluid container near the handlebars, place paper towels around every side to ensure no fluid touches the paint if it leaks.
- Unscrew the bolts on the brake fluid reservoir cap. Do not remove it quickly as this may cause fluid to drip on the motorcycle. You can also leave the cap on the reservoir after unscrewing the bolts since fluid can splash around while pressing the brake lever.
- Press the front brake lever several times and then squeeze and hold it for a while to pressurize the fluid. Open the bleeder bolt by turning the wrench about a quarter to let fluid out. Tighten the bolt back up after a second or two and release the brake lever. This process will help remove air bubbles. Repeat the process until the brake fluid bleeds out completely. If it doesn’t, you can use an injection to suck the fluid out from the fluid reservoir and dump it.
- If your motorcycle’s brake has dual calipers, you will have to repeat this process for the other caliper.
Refill the Reservoir with Fresh Brake Fluid
Use DOT-4 brake fluid to improve braking performance. However, first, check the motorcycle owner’s manual and the reservoir cover for the recommended brake fluid. While refilling the brake fluid, pour it in carefully to keep it from getting onto the paint.
After the reservoir has been refilled with fresh fluid, close the lid and tighten the screws.
Remove paper towels and clean off any remaining residue around the reservoir and calipers using a microfiber cloth.
Repeat the process to bleed brake fluid in the rear wheel brake. Press the rear brake pedal to pressurize the fluid. Most motorcycles have the rear brake reservoir located near the rear suspension or the seat.
2.5 Ride Carefully
Riding carefully can help your motorcycle brakes last longer. If you anticipate and avoid debris, potholes, and other obstacles on time during a ride, you will not have to use the motorcycle brakes as often. Motorcycle brakes wear out quickly if you ride aggressively and apply emergency brakes frequently. By riding smoothly and keeping a safe distance from the vehicle in front of you, you can reduce pressure on the brakes.
3. Frequently Asked Questions (FAQs)
3.1 How Often Should You Replace Brake Fluid?
Check your motorcycle owner’s manual to see how often you should replace your motorcycle’s brake fluid. However, it should be replaced at least every two years. Depending on the fluid’s condition, color, and level, it may have to be replaced earlier. Do not keep riding your motorcycle if the brake fluid level is low or has gone bad.
3.2 How Many Kilometers Before You Must Change the Motorcycle Brake Pads?
If you ride your motorcycle regularly and smoothly, you should change the brake pads every 3,400 to 4,600 miles. However, if you ride your motorcycle aggressively, you should change the brake pads earlier than the mileage range listed above.
3.3 What is the Best Motorcycle Braking Technique?
There are several useful techniques to help you apply the brakes safely. It is recommended you keep the motorcycle upright while applying the brakes. Also, do not apply only the front brake whether riding at fast or slow speeds. When a motorcycle slows down and comes to a stop by braking, more pressure is exerted on the front tire. Also, most motorcycles have a rear-wheel drive system; when you apply the front brake, the rear tire will still have some power that can cause nose lifting or slipping. Make sure to first apply the rear brake gently before applying both brakes to safely come to a stop.
4. Bottom Line
One of the crucial motorcycle components that require regular upkeep is the motorcycle brakes to ensure a safer riding experience. To ensure the motorcycle brakes work effectively and last longer, you should clean, inspect, and test your brakes after every long ride. To prevent rusting and early wear and tear, clean your brakes regularly with brake cleaners and a microfiber cloth. You must also regularly check the condition and level of brake fluid and replace it with a new one if the quality has degraded or become contaminated. Motorcycle brakes can also become worse if your motorcycle is stored for a long time during the winter. To fix any issues with your motorcycle, you must learn how to perform basic maintenance tasks.
For better motorcycle performance, the brakes must be reliable. You can further improve your motorcycle’s safety, comfort, and performance by installing a few add-ons available at Viking Bags, including fairings, crash bars, sissy bars, backrests, and handlebars. If you love touring, you must have saddlebags, sissy bar bags, and motorcycle trunk bags installed on your motorcycle.
Popular Collections


Leave a comment
All comments are moderated before being published.
This site is protected by hCaptcha and the hCaptcha Privacy Policy and Terms of Service apply.