Table of Content
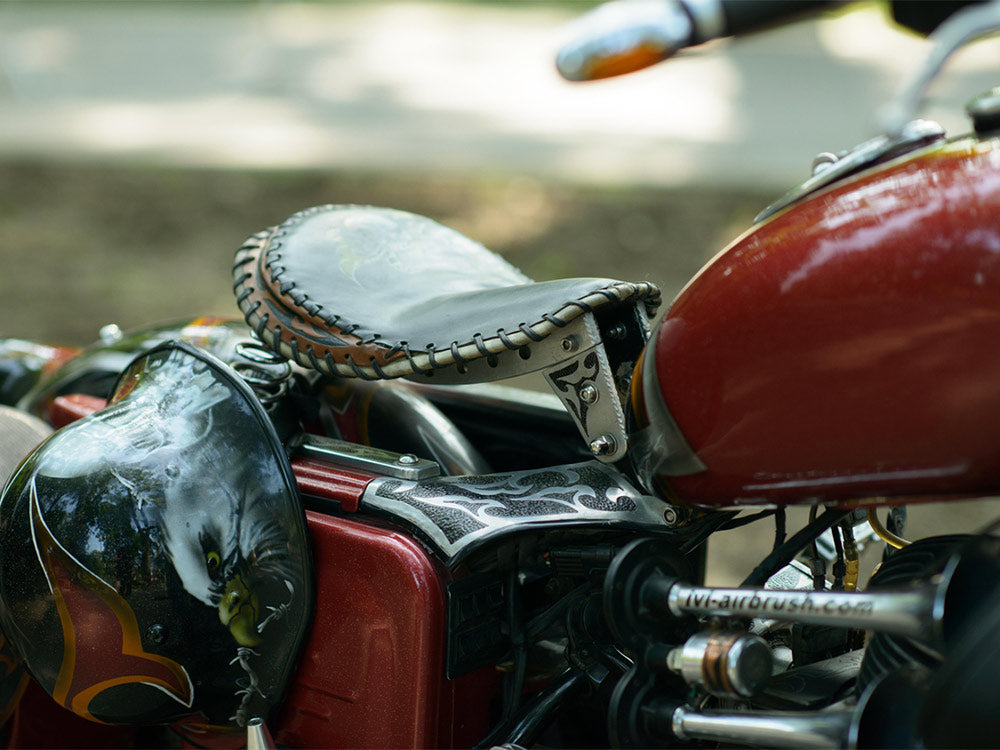
Your vintage motorcycle leather saddle has a story. You can get to know its story by looking at its exposure to sunlight, rain, wind, and years of rough use. However, this battered leather saddle does not need to remain that way. An old-school motorcycle leather saddle on a vintage bike is not something to fix, but to maintain along with your ride, and make it look great. This is how you can make old leather look new. Continue reading this article to learn the detailed process of vintage motorcycle leather saddle restoration.
1. Why Restore Your Motorcycle Leather Saddle?
A leather motorbike saddle is more than just a seat; it is a central part of the bike’s look. Once your bike saddle is old and beaten, it may affect the comfort when riding long distances. Leather cracks let water in and can make you wet as you ride, causing discomfort. The leather's color fades in the sun. The stains on the leather saddle diminish the sharpness, detail, and overall finish of your bike.
Nevertheless, you do not have to get rid of that old motorbike leather saddle. An appropriate restoration technique can save you a lot of money. A new seat can cost a lot. Only with proper work and treatment, your old leather saddle can appear and feel like it's brand new. Besides, you can keep your bike in its original style by having a vintage saddle.
Must Read: What is Viking Leather
2. Vintage Motorcycle Leather Saddle Restoration Process

2.1 Check Your Saddle: Know What You Are Dealing With
It is good to have a detailed look at your motorcycle's leather saddle before you begin to work.
What kind of shape is it in?
Does it have only minor scuffs or have serious cracks?
Is the stitching loose?
Is the foam smooth, hard, or flat?
Check the whole saddle, check seams for weak spots.
Touch the leather, is it hard and dry, or still soft?
Look for water stains, oil spots, or color fade.
Are there rips or tears?
Is the shape of the saddle still good, or has it been distorted?
These checks assist you in planning your work for restoration. Small scuffs only require a brush and a polish. Filler may be required in case of deep cracks on your motorbike saddle leather. A saddle that has been dried out requires deep oil or wax.
2.2 Get Your Tools Ready: Equipment and Materials
To fix a leather saddle properly, you will need the equipment. Here’s what to have on hand:
2.2.1 Cleaners
Good clean cloths
A cleaner brush
A good leather cleaner
Saddle soap works well.
Some people like saddle wipes; they are convenient to use.
2.2.2 Conditioning
Oil or Leather Conditioner:
Mink oil.
Neatsfoot oil.
Beeswax mixes
Some of the riders use olive oil for deep conditioning.
All of these work well for leather conditioning.
2.2.3 For Cracks
Use a leather filler that corresponds to the shade of your leather.
A butter knife or any other tool like that to inject filler in cracks.
2.2.4 For Repair
Sand Paper (Small Grit).
Leather Glue.
Thread (in case you need it).
2.2.5 For Finish
Leather Dye for polishing, to give your leather seat a new look and a good finish.
Heat gun.
Hair Dryer.
2.2.6 Additional Supplies
Lint-free cloths
Small brush.
Tape to cover parts that you do not want to treat.
2.3 Step One - Clean Your Leather Saddle With Care
Begin by cleaning up all the dirt and the grime.
Your saddle has likely soaked in dust, sweat, and rain.
Before you do any real work, you must have all that crud cleared off.
Remove loose dirt on the leather saddle using a soft brush.
Do not scrub hard; this will scratch the leather.
Then take a clean cloth and drench it with the water.
Now, wipe the entire saddle with this cloth.
Apply a leather cleaner or saddle soap on the cloth.
Reach the seams, under the saddle, and areas where the grime is concealed.
If the leather saddle is too old and dirty, some riders use hot water.
Make sure not to soak the leather.
Work in small spots.
Continue working on a dirty part until the spot disappears.
After cleaning the saddle, allow it to dry completely.
Make sure to keep the saddle in a dry place.
Don’t rush this step.
Wet leather does not take conditioner or filler.
2.4 Step 2 - Repairing Cracks in the Leather
One of the major issues with the old leather saddle is the cracks. Cracks allow water to get in and cause the saddle to get rough. The good thing is that most of the cracks are fixable.
2.4.1 Fixing Small Cracks
In the case of small cracks, use Mink oil or neatsfoot oil.
Apply it to the crack and rub it into the crack with your cloth.
The oil is absorbed into the leather to ensure a smooth appearance.
Use the oil several times on these leather cracks in the same way for days and weeks.
In this way, the cracks on the leather saddle may not disappear, but they will blend nicely for a cleaner look.
2.4.2 Fixing Deep Cracks
For deep cracks, you will likely need to use leather filler.
Filler can be forced into the crack using an old butter knife or a palette knife.
Flatten the filler until it is flat with the saddle top.
Let the filler dry as per the instructions mentioned on the product.
Smooth it out with the fine sandpaper.
Put the dye over it for a great finish.
Riders also use a beeswax and tallow mixture that they heat and soak the leather in.
Heat the mixture to 120 degrees.
Speak the saddle for a bit.
Let it dry fully
This penetrates deeply into the leather and is very effective on old, dry saddles.
2.5 Step 3 - Restore the Color and Shape
An old leather saddle becomes worn and deformed over time. You can fix both of these issues.
2.5.1 In Case of Faded Leather
You should use a dye that is the same color as your leather seat.
All you need to do is try it on a small, unnoticeable point.
Use a brush/cloth to apply the dye in thin, even strokes.
Let it dry between coats.
You may have to apply 2-3 coats to achieve the desired results.
2.5.2 For Warped or Bent Leather
To treat such issues, you can use heat.
Use a hair dryer on a low heat setting.
Warm the leather gently.
When warmed, the leather can be bent back to shape by hand or with a wood block.
Keep it in there until it cools down.
2.5.3 For Leather Saddlebags
With leather saddlebags, it is a good trick to place them in hot water for no more than 30 seconds.
This renders the leather pliable and supple.
You will be able to mold them to your liking.
Let them dry in that shape.
When they dry, stuff them with cloth or paper to retain the shape.
2.6 Step 4 - Condition the Leather Deep
This step is the key. Dry leather usually cracks and fades in color. Therefore, conditioner restores the leather's condition.
There are many good leather conditioners available in the market. Many riders trust:
Leather Honey: Trusted by many riders.
Bickmore Bick 4: It is a great option, too.
Lexol: Effective in general leather care.
Aussie Conditioner by Fiebing: Use beeswax as a water shield.
2.6.1 Leather Conditioning Process
Rub the conditioner on the saddle using a soft cloth.
Use round strokes.
Make it go deep into the leather.
Allow the conditioner to soak in for an hour or longer.
Some conditioners are more efficient when left overnight.
Next, polish the saddle with a dry cloth to shine it.
A single application of quality conditioner can last for half a year or longer. Repeat the application process when the leather becomes dry.
2.7 Step 5 - Repair Rips and Tears on the Leather Saddle
In case the saddle has rips and tears, you can repair it.
2.7.1 Fix Small Rips
Small rips in the motorcycle leather saddle should be sewn back together with a fine needle and thread.
Use small, close stitches.
If the tear is visible, the stitches should be as neat as possible.
2.7.2 Fix Larger Tears
Fixing large tears involves a leather patch kit.
Take a bit of paper that's a little larger than the tear.
Use the leather glue to attach the patch to the saddle.
Press the patch pretty hard.
Allow the glue to dry as suggested.
Rub the sides.
Use dye to make it blend.
2.7.3 Fixing Saddlebags With Cracks
The old pro trick to fix cracks on leather saddlebags is to use fused ABS plastic, along with the thinner.
Fill the cracks with this mix.
Give it some time to set until it becomes tough.
Sand it smooth.
It will hold up better than the leather filler.
2.8 Step 6 - Final Touches and Protection

After you have finished your restoration, polish your saddle.
Use a leather dye on any repaired areas so they match.
Let the dye dry fully.
Next, apply a final layer of conditioner.
Wipe it using a clean cloth for a better shine.
Some riders apply a long-term shield coating.
Buff it in well.
Allow a period of one week or more to ride after the cure.
3. Keep Your Saddle Looking Good
After you have restored your motorcycle leather saddle, do not leave it to return to that shape.
Use a soft cloth and leather cleaner to clean your leather seat at least once a month.
Condition it twice per year, or more frequently if you ride a lot.
Where possible, park your bike under the shade to avoid excessive heat or sun exposure.
During winter, use a motorbike cover to keep the bike protected.
Keep an eye out for any minor cracks or folds in the leather.
Identify minor problems early before they become huge.
4. When to Call in a Pro
Certain motorcycle leather saddle damages require the hand of a pro. When your saddle has significant wear on the foam, if the frame of the seat is bent or broken, or when the stitching has gone disastrously, you may need the assistance of a motorcycle leather workshop.
You should consult a pro to get your bike’s leather saddle redone for a new look. They can replace foam and can restitch seams. It is more expensive than the DIY, but with a real old saddle, it can be worth the money.
5. Conclusion
It is worth saving your old motorcycle leather saddle. It can be restored to look good and feel nice. With the above-mentioned restoration steps, you can fix most issues with your leather seat. Also, with proper care of the leather, you can keep it looking new. Make sure to clean it well, condition it often, fix cracks and tears, and protect it from the sun and rain.
A good restoration process can do a lot better for your bike’s saddle. It can give it a new life. It is also a money saver compared to purchasing a new saddle for your bike. Above all, it keeps the vintage look of your bike.


Leave a comment
All comments are moderated before being published.
This site is protected by hCaptcha and the hCaptcha Privacy Policy and Terms of Service apply.