Table of Content
1. Purpose of Motorcycle Handlebars
To be able to operate and steer a motorcycle, you will need to install motorcycle handlebars. Motorcycle handlebars are long metallic forks that are mounted towards the front, positioned just behind the headlight(s). Though fixed in place, you are able to turn the handlebars in a wide arc which allows you to maneuver in whichever direction you need to go. Depending on the distance between the bars, this will determine how far your arms are spread apart as well as how comfortably your wrists, shoulders, neck, and elbows are positioned.
Whether you rely on your motorcycle as a regular means of transportation or only take it out to go on long trips, motorcycle handlebars are essential if you wish to avoid obstacles, reach destinations, and give your ride a stylish look. If you are interested in purchasing motorcycle handlebars, this guide will give you a detailed overview of what Viking Bags has in stock.
2. Types Of Motorcycle Handlebars
Because motorcycle handlebars are built with a universal design and can be fitted to custom models, it is possible to mount this equipment on a variety of motorcycle models that fall under the Harley-Davidson, Honda, Suzuki, Kawasaki, Yamaha, Victory, Indian, and Triumph categories.
While any version of the motorcycle handlebars would provide the necessary means of steering, you may want a product that includes customization or additional features. Depending on the motorcycle model you own and the measurements for your upper body, you may require an option that best accommodates your needs. Listed below are the various types of motorcycle handlebars you can choose from:
- Stock Handlebars: The classic version of motorcycle handlebars, it is the factory manufactured standard that is included with the vehicle upon purchase from a company or dealer. This is a broad term referring to any handlebars that do not fall under the specific categories listed below.
- Touring/Dresser Handlebars: This version tends to be significantly larger in size compared to other motorcycle handlebars. They are designed with a wide base so that they are compatible with the dimensions of any fairings they are being mounted to.
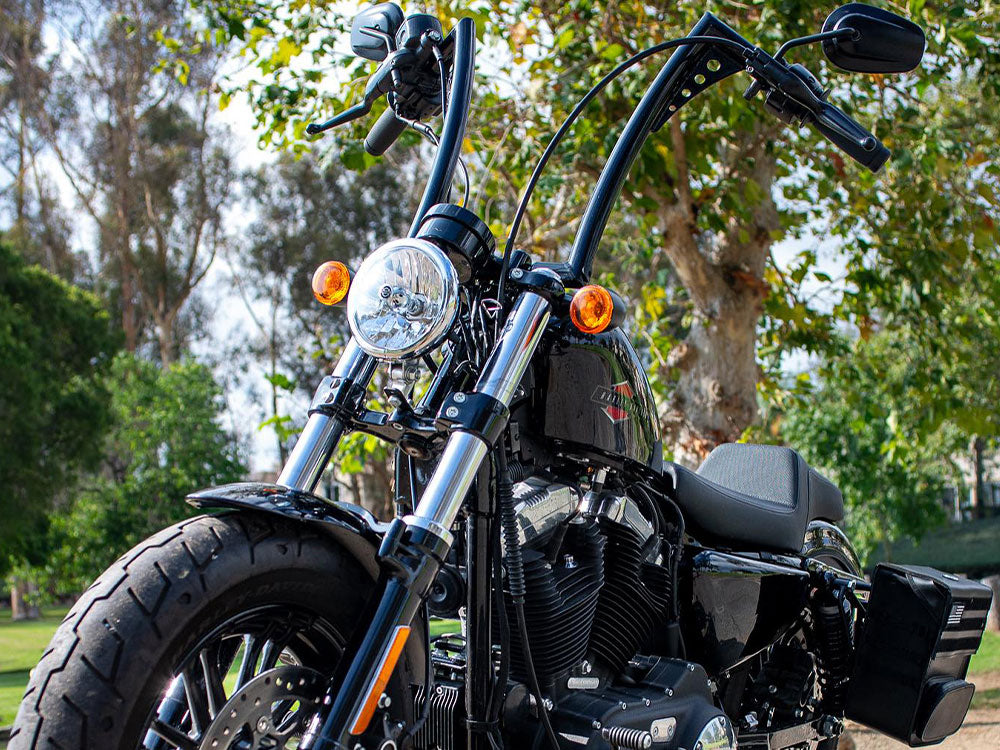
- Ape Hangers: Due to this version having a tall height and resting at an angle when installed, this results in riders having to lean backwards while holding the grips in a manner reminiscent of an ape. Because the rise height forces riders to extend their reach, this tends to be a favorite among experienced riders who care about complimenting the style of their vehicle rather than comfort and security while operating it.
- Buckhorn Handlebars: Similar in design to the Ape Hangers, they deviate slightly due to having a shorter rise height and a curved angle. These tend to be constructed out of metal tubing layered with steel, aluminum, chrome, or titanium. Though it takes practice to learn how to handle, they are ideal to have for long distance trips.
- Z-Bars: Aptly named for sharp 90° angles between the mounting points and the bend of the motorcycle handlebars. They are popular due to their versatility and being easy enough to handle for even novice riders.
- Drag Handlebars: This version has a shorter design that requires you to be in a forward-leaning position to be able to reach it. While there is variation in their pullback lengths, they typically have a low rise height or no rise at all. It is best suited to be mounted onto café racers, cruisers, and choppers.
- Beach Handlebars: This version draws influence from cruiser models in its design due to its pulled-back style. The grips come close to you thanks to the curved, long bend that gives it a U-shape. These are ideal to have for long distance trips.
- Clip-On Handlebars: This version comes in a two-piece set that can be mounted onto your motorcycle’s front forks. Though suited for sports bikes, it can also be mounted onto cruisers, cafe styles, etc. Because they are adjustable, it is possible to change its positioning to different heights and angles.


3. Most Popular Motorcycle Handlebars
Whether standard or custom-made, there are motorcycle handlebars that stand out from the others in the market. These kind of unique examples have specific features that increase their functionality and improve the riding experience.
The Arlen Ness Three Way Adjustable Low-Pro Handlebar is constructed out of chrome metal tubing with aluminum clamps to help secure it to your motorcycle. Because they are adjustable, it is possible to reposition it based on wrist angle, height, and distance. Each adjustment point and clamp is knurled to increase the grip and ensure the motorcycle handlebars are extra secure. It also includes tubing spacers to help raise or lower the height if necessary.
The Roland Sands Design King Ape Bagger Handlebar is constructed with a stylish multi-hole drilled corner gusset to help improve this product’s rigidity and durability. Thanks to the openings along the structure, it is easy to insert wiring or electrical connections during installation. Thanks to the lower contour bend, it is possible to mount this to a motorcycle without having to make adjustments to any fairings.
The LA Choppers Chrome Twin Peaks Handlebars is built with parallel wrist angles to make it more comfortable while riding. Because of the flowing bends on the upper section of the motorcycle handlebars makes it suited to be mounted onto Batwing models with fairings. This product is compatible with hydraulic clutches plus cable and Throttle By Wire applications. It is easy to insert wiring or electrical connections during installation.
The KST Kustoms Mayhem Bagger Handlebar is made out of ornamental grade stainless steel which ensures the product is durable yet stylish. They are designed with 1 inch thick controls and grips with the edges being knurled to ensure it is easier to keep hold of. Thanks to the laser cut slots, it is easy to insert wiring or electrical connections during installation.
The HardDrive Rise Buckhorn Handlebar is constructed from premium steel tubing which ensures this product is long-lasting, durable, and lightweight. Drawing inspiration from the traditional motorcycle handlebars, this product is compatible with most motorcycles except 1980 to 2016 Touring models with fairings. Its design makes it adjustable so you can reposition it to suit your preferred wrist angle, height, and distance.
The Emgo Sport Handlebar is made from carbon steel fiber which helps make this product both lightweight and durable. This is suitable for both novice and experienced riders since it is possible to experiment with different riding styles despite being a Sportster style motorcycle handlebar. It is also compatible with both old and new motorcycle models, as this product can be mounted without the use of tools or modifications.
4. Types of Motorcycle Handlebar Mounts
Depending on whether you rely on your motorcycle as a regular means of transportation or only take it out of the garage for long vacation trips, this may determine whether you want motorcycle handlebars that are easy to install or difficult to budge. You are given mounting hardware that comes with your purchase of motorcycle handlebars. When mounting your motorcycle handlebars, you either have the option of using a quick disconnect or hard mount system.
The quick disconnect system saves time by being easy to attach to your motorcycle. You are able to fasten or remove it from your vehicle within a few seconds. It is convenient if you do not operate your motorcycle everyday.
The hard mount method offers a more permanent and hardier means of keeping your motorcycle handlebars fixed to your ride. Though it takes longer to mount or remove, this method helps the motorcycle handlebars remain tightly fastened. Even in the face of the elements, the motorcycle handlebars will not be easily loosened.
5. Tips On How To Select Motorcycle Handlebars
As you continue to browse for motorcycle handlebars, you may have trouble narrowing down your choices. If you are presented with a plethora of options, it can be hard to determine which is the best choice for your specific motorcycle model. You may have difficulty deciding the criteria for what you are looking for in motorcycle handlebars and determining which ones satisfy your concepts of functionality or style. Here is a list of suggestions for how to go about selecting the best motorcycle handlebars for you:
- For diameter, most motorcycle handlebars are built at least 1 inch. Depending on the diameter, that will determine the circumference and thickness of the bars
- For width, choose motorcycle handlebars that best matches your shoulder width
- For the rise, choose motorcycle handlebars that are level with your arms when holding the grips
- For center width, make sure that it is the correct measurement if you intend to install the motorcycle handlebars on a vehicle with fairings
- For the pullback, check that the tips of the motorcycle handlebars are not at an awkward angle to prevent difficulty when holding the grips
- For riser spacing width, make sure that it is the correct measurement so that it clamps securely when connected to your motorcycle
- Pick motorcycle handlebars that is within an acceptable price range and is designed to fit the model you own
6. How To Install Your Motorcycle Handlebars
At Viking Bags, you are provided an installation guide that you can download for free before or after purchasing your motorcycle handlebars. The instructions are easy-to-follow so that the process of mounting your new equipment is quick and simple. Here is the step-by-step directions for how to install your motorcycle handlebars:
- Prop up your motorcycle using the kickstand then take measurements of the motorcycle handlebars to confirm its compatible with your vehicle
- Remove any equipment that could obstruct installation if necessary such as the gas tank, windshield, fairings, etc.
- Remember to disconnect any wires or electrical connections
- Install a clamping bar towards the center, horizontal section towards the front of the motorcycle
- Tighten the clamping bar using a screwdriver and make sure it is perpendicular to the rest of the motorcycle
- Line the motorcycle handlebars over the clamping bar and run the wires or electrical connections through it before attaching it. Make sure to tighten it until it is secure and that it is not caught on anything
- While the motorcycle is parked, check that the motorcycle handlebars is working by swiveling it in both directions
Popular Collections


Leave a comment
All comments are moderated before being published.
This site is protected by hCaptcha and the hCaptcha Privacy Policy and Terms of Service apply.