A motorcycle fairing is a decorative accessory that can transform a standard naked bike into a stylish sports bike. The fairing is mounted on the front of the motorcycle and takes the brunt of the damage in a head-on collision. Being made of fiberglass or ABS plastic, they tend to break, scratch, and crack. When a fairing becomes broken, it must be replaced. Many choose to ride their bikes without one because new fairings can be expensive. Others look for budget-friendly options like making repairs or creating a fairing from scratch.
Building a motorcycle fairing is a time-consuming process that requires a significant amount of planning. You have to design the fairing, choose its size and shape, create the mold, fabricate, and then paint the fiberglass fairing. Fiberglass is easy to use, affordable, and a durable material used by well-reputed brands that design aftermarket motorcycle fairings. 3M polyester or fiberglass resin is another material you can use due to its impressive durability and lack of cracking noises when bent.
Table of Content
1. DIY Custom Motorcycle Fairing
Creating a motorcycle fairing typically involves four steps, whether you want to create a small handlebar, quarter, or full fairing. Before creating a fairing, determine what type you need. If you frequently travel on highways, then you need a full fairing to provide adequate wind protection. If you ride within the city, you only need a small handlebar to create a stylish custom look. Knowing the type of fairing you need will help you narrow down the measurements and design.
1.1 Step 1 - Design the Motorcycle Fairing
| Tools You’ll Needs |
|---|
| Measuring Tape |
| Paper/Sketch Pad |
| Pencil |
| Pre-Designed Fairing Plan (optional) |
- Take a measuring tape to measure the length and width of the area where you’ll mount your motorcycle fairing. This could be around the headlight, front fork, frame, handlebars, rear fender, etc. For front fairings, make sure they do not get in the way of the handlebars.
- Record the measurements on paper and sketch a design of your motorcycle fairing. The sketch should include air vents, mounting points and holes, and spaces for speakers if you want to add a stereo system to your motorbike. You can also buy design plans or sketches for your motorcycle’s specific model.
1.2 Step 2 - Prepare the Motorcycle Fairing Prototype
| Tools You’ll Needs |
|---|
| Foam Blocks/Clay |
| Sander |
| 400 Grit Sandpaper |
| Trimming Tool/Cutter |
| Body Filler |
| White Glue |
| Permanent Black Marker |
- Create the shape of the fairing (prototype) with blocks of foam or clay.
- Cut and discard any excess material using a trimming tool, a hot knife, or an electric cutting machine. Leave 2-3 inches of excess material in case you need to make changes or add details to the design.
- Use a sander to smooth out the edges and refine the fairing’s design. You can also use the sander to add curves, crevasses, and contours. You can also draw lines with a permanent marker, then use an electric knife to cut the shape.
- Once the base shape of the fairing is complete, create mounting holes and air vents.
- Sand the fairing prototype again and fill any gaps with the body filler. You can also sand the excess body filler with 400-grit sandpaper or an electric sander.
- Place the prototype on the part of your motorcycle you plan to mount it to and check whether all the mounting holes are correctly aligned. Also, check that there is enough clearance for the handlebars to turn fully.
- Apply diluted white glue on the prototype and leave the glue to dry. Once the mold becomes rigid, you can add fiberglass to finish creating the fairing.


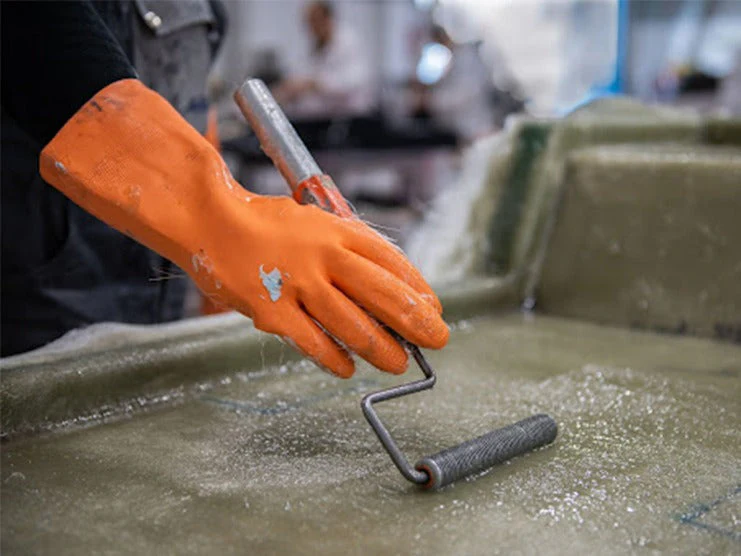
1.3 Step 3 - Create the Fiberglass Fairing
- Cut the fiberglass cloth to the correct length and mix the hardener with resin. Follow the instructions on the products to get the right consistency.
- Place the first layer of fiberglass cloth on the mold. If you are using different types of fiberglass cloth, put on the heaviest one first.
- Apply the resin with a paintbrush until the fiber cloth layer is completely soaked. The cloth should become transparent after absorbing the resin.
- Place a second layer of fiber cloth over the first layer and press it firmly to remove air. After compressing the second layer of the fiber cloth, apply resin-like before.
- Remove air bubbles by gently applying pressure to the second layer. In factories, compression molded fairings have pressure applied on the liquid ABS plastic. Since you don’t have access to machinery or liquid ABS plastic in your garage, use a small squeegee wiper instead to apply even pressure.
- Apply 2-3 more layers of fiber cloth, then apply epoxy resin until all the layers seem completely soaked. Leave the polymer resin and epoxy resin to cure. The curing process usually takes up to 24 hours depending on the type of resin used. Applying epoxy resin will improve adhesion between the fiber cloth layers.
- Once it finishes curing, remove the fiberglass fairing from the mold and place it on the motorcycle to make sure it fits. Once you are satisfied with the design, sand the surface and drill holes in the fairing as per the design.
- To get the size of the mounting bolts right, check what kind of bolts are provided by manufacturers for your motorcycle before buying the correct size at the hardware store. Always apply Loctite on the bolts before installing the fairing.
1.4 Step 4 - Prime and Paint the Fairing
Once your fairing is complete, apply primer and paint to create a protective, factory-grade finish.
| Tools You’ll Need |
|---|
| Degreaser |
| 400 Grit Sandpaper |
| Primer Spray |
| Multi-Purpose Metallic Spray Paint |
| Lacquer/Clear Spray |
| 1500-2000 Grit Sandpaper |
| Polish |
| Power Polisher |
- Clean the fairing with a degreaser or soapy water.
- Sand the surface rigorously with 400 grit sandpaper. Make sure you pay extra attention to the corners and curves.
- Apply one coat of adhesive primer on the fairing. Make sure the entire plastic bodywork gets even coverage.
- If you find any scratches or imperfections on the fairing after applying the primer, you can cover the body filler and sand it with 400 grit sandpaper.
- Apply a color coat of your choosing. For the best results, opt for a multi-purpose metallic spray paint that can be applied on plastic surfaces. Apply 3-4 light coats of paint. Let each layer dry for 5-10 minutes before applying the next layer. Keep the aerosol can 6-10 inches away from the surface and spray the paint in a sweeping motion.
- Leave the paint to dry for 2-3 hours. Some paints dry completely within an hour and can be handled immediately after.
- Apply a generous amount of clear coat on the fairing and leave it to dry for one hour. Wet sand the surface again with 1500-2000 grit sandpaper.
- Apply polish and buff the fairing with a power polisher. Your DIY motorcycle fairing should be ready to install.
2. How Much Does It Cost to Build Your Motorcycle Fairings?
If you build a fiberglass motorcycle fairing yourself, it will cost about $300, including the mold, fairing parts, body filler, paint, resin, primer, brushes, and other features. A full fairing can cost around $500 or more since it would require more filler, fiberglass, and other materials.
3. Takeaway
Making a motorcycle fairing yourself can be an exciting project that challenges your ability to handle different tools and materials. But don’t expect to get a fairing that can compete with an OEM fairing on your first attempt. A lot of trial and error is involved in DIY projects. Make sure you read this guide carefully, watch multiple Youtube videos, and ask other custom builders questions. The budget may also exceed your original plan.
If the fairing prototype doesn’t fit, the fiberglass cloth layers don’t stick properly, or the resin does not have the right consistency, a lot of the material would be wasted. The same can be said for paint, primer, and color coat. Always get double the amount of supplies you need before starting your DIY custom fairing project. Moreover, it can take 30-40 hours to complete a fairing if you are a beginner. To make sure your fairing has the right shape and size, you can check other fairings online or in stores for comparison before fabricating your fairing. But if you don’t have the budget, skills, time, or patience, you can buy a used fairing instead.
Popular Collections


Leave a comment
All comments are moderated before being published.
This site is protected by hCaptcha and the hCaptcha Privacy Policy and Terms of Service apply.