Table of Content
Every motorcycle company tries to make the best motorcycle parts that have considerable longevity and improve the riding experience. But over time, motorcycle parts start to wear down due to extended use. A common problem that most motorcycle owners face, especially with older motorcycles, is figuring out how to clean the motorcycle gas tanks.
1. Common Problems
Here is a list of problems that riders might find with their motorcycles’ gas tanks:
Damage to the paint on the outside of the tank
Here are some factors that cause this problem:
- Putting luggage on top of your motorcycle gas tank without covering it.
- Accidental scratches that damage the gas tank’s paint.
- Not covering the gas tank with a sheet when not in use.
Rust on the inside of the gas tank
Here are some factors that cause this problem:
- Not putting fuel in your gas tank for a long time
- Not properly closing the gas tank
- Not using good quality fuel
- Refueling only one side of the tank for fuel while leaving the other side empty
2. Clean Motorcycle Gas Tank from the Outside
2.1 Washing the Tank
The simplest way to prevent your motorcycle gas tank from getting scratches or rust on the outside is to remove any dirt and debris. Try to wash the outside of the motorcycle gas tank with a detergent once a week or once a month depending on the weather condition.

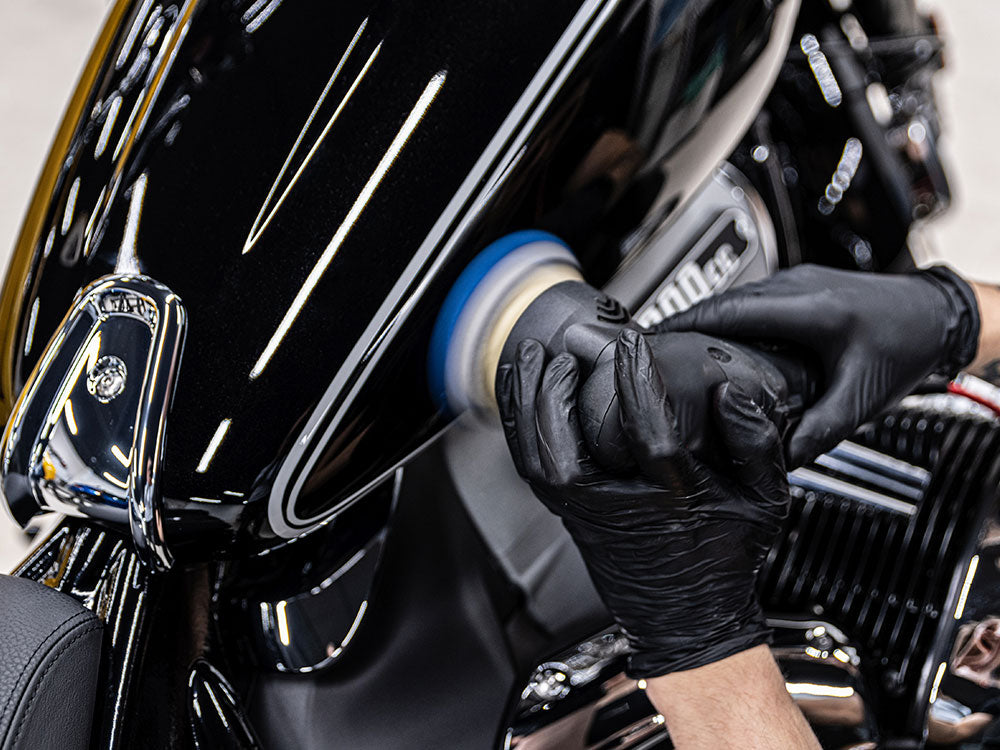
2.2 Using Good Quality Wax or Ceramic Coating After Cleaning
Applying wax or ceramic coating is a simple way to keep your motorcycle shining. Whenever the bike is washed, try to use good quality wax on your bike’s exterior and always use a soft cloth to clean the surface. A con about waxing is that it lasts only for 1-2 months. However, it does help maintain the shine of your bike.

An alternative to waxing is to apply a ceramic coating on the gas tank’s exterior. An advantage of good-quality ceramic coating is that it will stay applied to your gas tank’s surface for months or even a year.
2.3 Wrapping the Tank
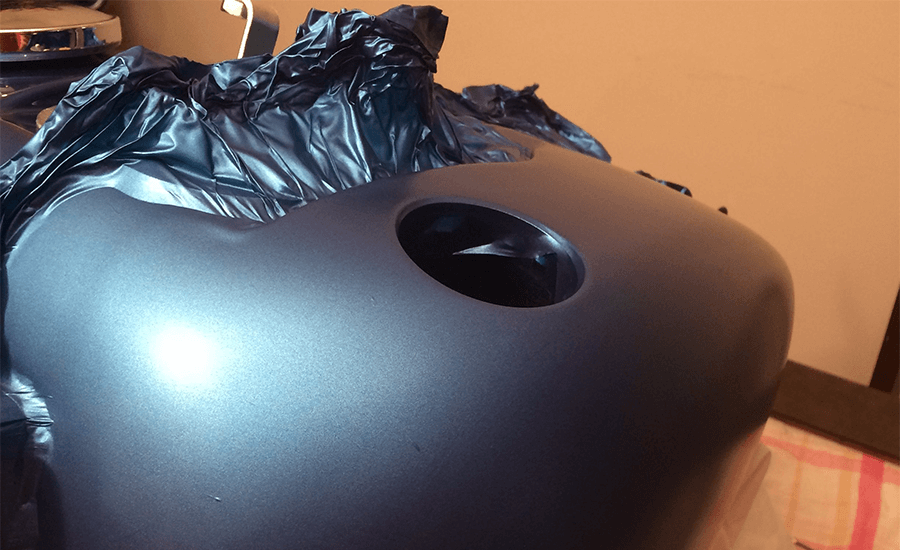
Many riders prefer leaving the tank as it is without wrapping it in a sheet. Although the stock look of a motorcycle has an appealing look, it also reduces the adhesion of the paint and the shine of the gas tank’s surface. Try to wrap it with a transparent plastic sheet. It will not completely alter the original look of your bike and will also protect the gas tank from minor scratches.
3. Cleaning Motorcycle Gas Tank from the Inside
Another problem most riders face when it comes to their motorcycle gas tanks is that they can get rusty from the inside for the same reasons mentioned earlier. Luckily, there are ways to clean the inside of a motorcycle gas tank. It is recommended you remove the gas tank from your motorcycle first before you being cleaning. Many of the cleaning products could damage your motorcycle if they went into the fuel pump and engine.
3.1 Using Muriatic Acid
Muriatic acid is a diluted solution of hydrochloric acid (HCL). It is available at hardware and online stores. Muriatic acid is useful when cleaning rust off metal surfaces. Here are images of a gas tank that was cleaned with muriatic acid.
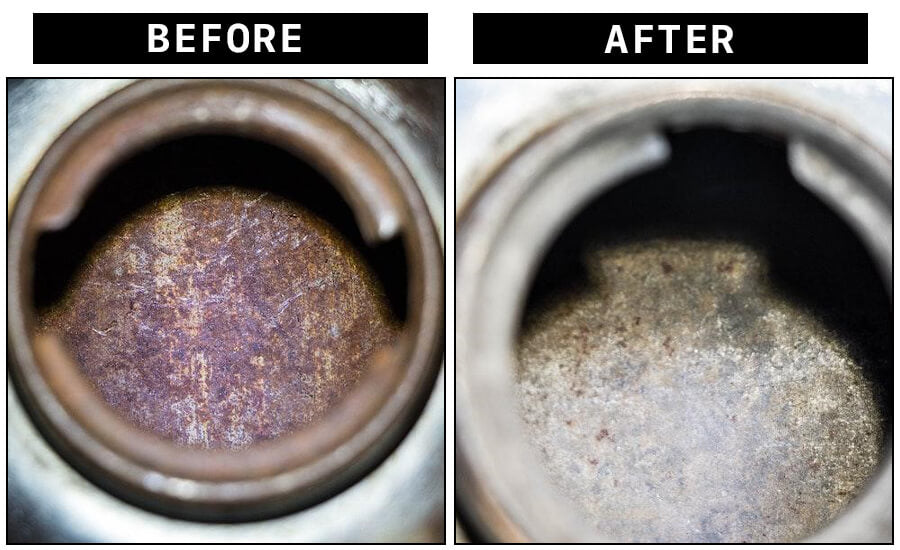
Precautionary Measure
Although muriatic acid is a diluted acid, it is still corrosive and can irritate the skin and eyes. Therefore, put on proper safety equipment before handling this acid. The safety equipment should include gloves, eye goggles, and a mask.


Procedure
- Unscrew the motorcycle gas tank’s cap.
- Empty all the remaining fuel from the tank.
- Remove the petcock and block the hole.
- Try to wash out as much residue and debris as possible by rotating the gas tank
- Fill the gas tank with a dishwasher and water.
- Block the gas tank cap hole using tape and shake the gas tank for a few minutes; this will help rinse out any rust.
- Drain the water as much as possible because any remaining soapy water will neutralize the effectiveness of the acid.
- Make a 50/50 solution of muriatic acid and water.
- Fill the gas tank with the solution, cover the cap hole with tape, and leave it alone for 15 minutes.
- Drain the solution from the gas tank and dry off the gas tank by air drying or using a hair dryer.
- If possible, put a small amount of diesel in the gas tank and twist the gas tank in such a way that the diesel is applied to every wall of the gas tank. Doing so will prevent the gas tank from rusting.
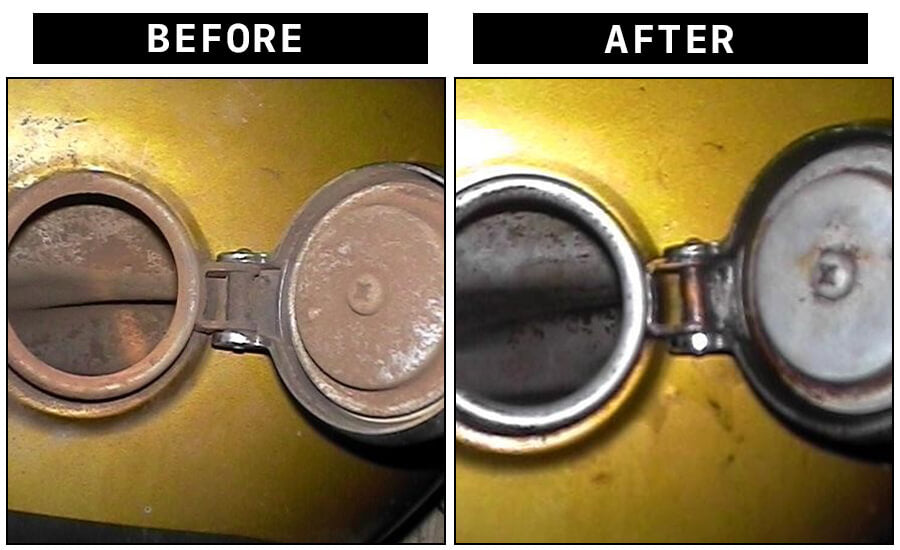
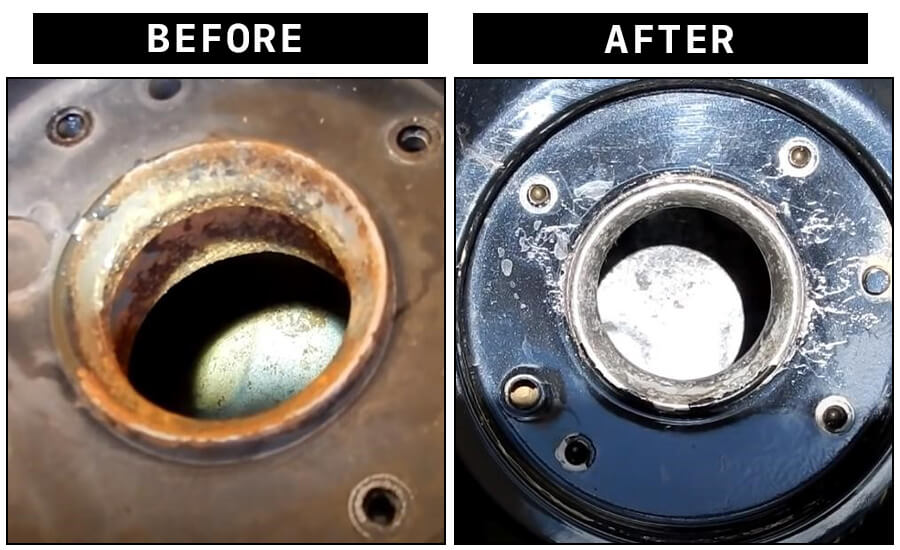
3.2 Using Phosphoric Acid
Phosphoric acid can also be used to remove rust from the gas tank. It is applied the same way as muriatic acid. Phosphoric acid is corrosive and can irritate the eyes and skin. It is commonly used in household cleaning products, fertilizers, and detergents. For rust cleaning, wearing safety equipment is necessary to prevent the body from being harmed by chemicals. The safety equipment should include gloves, eye goggles, and a mask. Here are images of a gas tank that was cleaned with phosphoric acid.
Procedure
- Unscrew the gas tank’s cap.
- Empty all the remaining fuel from the tank.
- Remove the petcock and block the hole.
- Try to wash out as much residue and debris as possible by rotating the gas tank.
- Wash the gas tank using a dishwasher and water. This will help clean out the thin layer of rust.
- Drain the water as much as possible since any remaining soapy water may neutralize the effectiveness of the acid.
- Fill the tank with phosphoric acid, cover the tank hole with tape and shake the gas tank so that the acid covers the inside walls of the gas tank. Then leave it for 10-15 minutes.
- Drain the acid from the gas tank and dry the gas tank by air drying or using a hair dryer.
- If possible, apply diesel to the gas tank, twisting the gas tank in such a way that diesel is applied to every wall of the tank. This will prevent the tank from rusting.
3.3 Using Vinegar and Baking Soda
Using vinegar and baking soda is the cheapest, most effective, hazard-free method, and time-consuming method. White vinegar is available at every store. It is a diluted form of acetic acid, containing only 4-6% of acetic acid. Baking soda is a reliable cleaning agent, especially in removing grease and dirt stains.
Using vinegar to clean rust from the gas tank is a hazard-free method. Still, it is recommended you wear gloves and eye goggles to prevent the vinegar from irritating your eyes. Here are images of a gas tank that was cleaned using vinegar and baking soda.
Procedure
- Remove the gas tank’s cap
- Remove the petcock and block the hole.
- Wash the gas tank using a dishwasher and water. This will help clean off any thin layers of rust and debris.
- Drain the water as much as possible since any residual soapy water may neutralize the effectiveness of the acid.
- Fill the gas tank with vinegar and leave it for at least 24 hrs.
- Drain the vinegar and fill the tank with a solution of baking soda and water. This will help neutralize any residual vinegar.
- Drain the baking soda solution and dry the gas tank by either air drying or using a hair dryer.
This method is cheap and effective but is also a very slow process because vinegar is a diluted acid that takes time to work. If after step 5, rust is still left in the gas tank, then fill the gas tank with vinegar again and leave it for another 24 hrs.
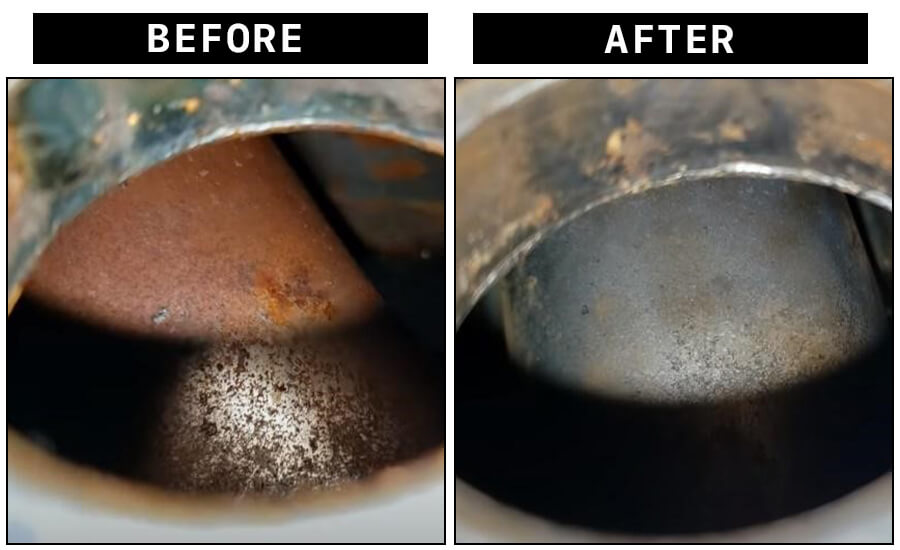
3.4 Using Electrolysis
The electrolysis method is efficient and technical, but it can be difficult to do because it must be done with extreme care. Even a little negligence can ruin the process. This method is time-consuming but can be done quickly if a bigger battery is used. Here are images of a gas tank cleaned using the electrolysis method.
Apparatus
- A soft iron or steel rod that can be used as a node
- A 12-V battery with two terminal clamps
- A piece of wood or plastic that can be used for holding
- Water
- Washing soda
- Duct tape and petcock blockage holders
- A bucket
- Some nuts and bolts
Safety equipment should include eye goggles, gloves, and a mask.
Procedure
- Remove the gas tank’s cap from the motorcycle and empty it of any remaining fuel.
- Remove the petcock and block the hole.
- Pour water into the tank and block the holes around the gas tank with duct tape before shaking it. Drain the water after a few shakes and rinse off the thin layer of rust.
- Fill the tank again with a solution of water and washing soda (2-3 cups will be enough for a full tank).
- Attach the clamp of the battery’s negative terminal to the gas tank, then attach the clamp of the battery’s positive terminal to the iron/steel rod.
- Hang the iron/steel rod with the piece of wood or plastic in such a way that it does not touch the bottom or sides of the gas tank.
- When everything is set in place, switch on the battery and leave the gas tank for a few hours.
- If the process is done correctly, the rust residue will appear on the anode steel/iron rod.
- Remove the rod and disconnect the battery, drain the solution into a bucket. Rinse the gas tank again with water to rinse off any residues left.
- Dry the gas tank by air drying or using a hair dryer.
3.5 Using Rust Remover Chemical
There are a ton of rust-removing chemicals like WD-40 available on the market. They are very easy to use, effective, and take little time to work. A lot of people prefer to use them but the only problem with them is that they are very expensive compared to the other methods listed above.
4. Frequently Asked Questions (FAQs)
4.1 What is the best way to remove rust from bike parts?
If someone wants a cost-efficient and safe method for removing rust from motorcycle parts, then using vinegar is the best solution. If someone wants a less time-consuming method with good results, then using a rust remover like WD-40 is the best solution.
4.2 How can you tell if your gas tank is rusted?
Simply remove the gas tank cap and illuminate the inside of the tank. If there is a brownish layer inside the tank that is visible, this means the tank is rusted.
4.3 How to keep an empty, clean gas tank from rusting?
Rust occurs on dry surfaces but does not occur on oily surfaces. To keep a gas tank from rusting, simply apply a thin layer of oil inside the tank before leaving it for a long time or use a small amount of diesel.
4.4 What causes a gas tank to rust?
There are various reasons why gas tanks rust, such as leaving the gas tank empty for a long time, leaving the gas tank open, not using refined fuel, etc.
4.5 How to neutralize vinegar to avoid rusting?
Vinegar contains acetic acid, so to neutralize it, you must rinse the metal with a solution of water and baking soda.
5. Conclusion
All these methods for cleaning a motorcycle gas tank are effective and easy to apply. Some people prefer using rust remover chemicals or using acids because they are less time-consuming compared to electrolysis and vinegar. However, the electrolysis method can be done faster if a bigger battery is used. Some people prefer using vinegar and electrolysis because they are cost-efficient and give the same result as the other methods.
However, extra accessories like Saddlebags, Tank bags, Sissy bar bags, Sissy bar, Crash bars, Luggage Racks, Trunk, Handlebars bags, Seats, etc. are bought from the online stores.
Popular Collections


Leave a comment
All comments are moderated before being published.
This site is protected by hCaptcha and the hCaptcha Privacy Policy and Terms of Service apply.