Table of Content
The most integral part of a motorcycle that requires immense care and upkeep is its engine. However, probably the most underrated element on the priority list of most motorcyclists is the motorcycle battery. A battery is responsible for bringing the motorbike to life by producing a spark and current to switch on the engine and power the electrical systems, including lighting, horn, LCDs, and other safety features. Without a functional battery, a motorcycle will not start.
Most of the time when your motorcycle is not starting, there are high chances that your motorcycle has a bad or dead battery. Therefore, to avoid situations in which you are stuck with your motorbike somewhere because it is not starting and you can’t figure out what to do, make sure you at least know how to test a motorcycle battery and keep it healthy. Continue reading this article to learn how to test a motorcycle battery.
1. Getting Started on How to Test a Motorcycle Battery
Before you start digging out wires and electrical systems and getting your battery out from your motorcycle to perform tests, you must ensure that the problem is with the battery.
It is not always your motorcycle battery causing starting issues. What if your motorcycle doesn’t have fuel or the spark plug is failing to produce current and start the ignition process?
There can be an issue with your key fob as well. Some modern motorbikes with security systems do not start until a few prerequisite conditions are met. For example, the safety switch installed does not allow the motorcycle to start until the bike is removed from its kickstand.
The other major problem you can expect if your motorcycle does not start is a mechanical issue.
2. Signs of a Bad Motorcycle Battery

Before your motorcycle completely gives up due to a bad battery, you must keep an eye on various signs indicating a bad motorcycle battery. If you are aware of these signs, you can take a precautionary step on time before your motorcycle completely stops.
A bad motorcycle battery can show any of the following signs:
The lights on your motorcycle become dull and the headlight does not cover the same range as it used to before when the battery was in perfect condition.
There comes a time when your motorcycle lights fail.
The motorcycle struggles to start.
The starting sound a motorcycle produces is weak.
The motorcycle completely fails to start.
2.1 Battery Age
If your motorcycle battery is showing problems, does not provide enough power to the electrical system installed, and promotes cold starting, it is maybe because it is old now. You must consider replacing your battery in such a situation, especially if it is five years old.
2.2 Inactive Battery
If you haven’t used your motorcycle for more than 14 days, there is a high possibility that the battery has become bad and will show problems.
3. How to Test a Motorcycle Battery Without a Multimeter
Don’t have a multimeter? You can still test your motorcycle battery if you are having trouble starting your motorcycle and having issues with your battery. One way to test a motorcycle battery without a multimeter is by using a 12 V light bulb.
Connect the battery’s terminal to the 12 V light bulb and check if it glows perfectly or not.
If the light is bright, the battery is fine.
If the light turns out to be dim, the battery is either bad or undercharged.
3.1 The Quick Battery Test
The first thing you should do to test a motorcycle battery is to turn on your motorcycle headlamp and check if the light is bright enough. If it is dim, it means your battery doesn’t have enough power to start a motorcycle.
3.2 Visual Test / Battery Inspection
The visual test or battery inspection includes the following steps to help you find out whether you should carry on with the existing battery or if it needs to be replaced. It includes the inspection of the physical condition of the battery.
Check out for any corrosion, discoloration, and cracks in the battery casing.
Check if there are any signs of swelling. The swelling indicates that the battery is overcharged and overheated.
Carefully observe the battery terminal if they are broken or not tight.
You must also check for any fluid leakage.
Dust and debris sitting on different parts of the battery is also a major indication of why it is not working properly. The accumulated debris on the terminal can cause restriction in the flow of current and hence, it must be cleaned.
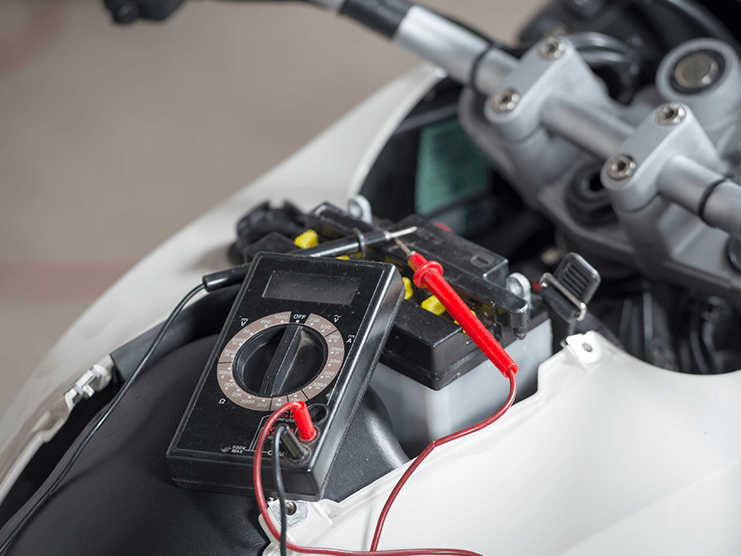
4. How to Test a Motorcycle Battery with a Multimeter

A multimeter is the most commonly used instrument/device to test a motorcycle battery and is safe to use. The process is one of the easiest and you only require a multimeter for that. Follow the below steps to test a motorcycle battery using a multimeter:
Access the battery terminals on your motorcycle. You may need to remove the seat of your motorbike or simply remove the battery cover to access the terminals depending on your motorcycle.
You do not need to take out the battery from your motorcycle if you can easily access its terminals.
Take out the multimeter and connect the leads with it.
Keep the multimeter off until it is not connected to the motorcycle battery.
Connect/attach the red probe of the multimeter to the positive terminal of the battery and the black probe of the multimeter to the negative terminal of the battery.
To check the voltage of your motorcycle battery, turn on the multimeter by switching the knob to face the DC V option. It will be the one with a straight and a segmented line on the V .
The reading on the multimeter screen will tell whether your motorcycle battery is good or bad.
The voltage reading shown on the multimeter’s screen is the charge stored in your battery. Consider the below motorcycle battery voltage chart/table to know the condition of your motorcycle battery.


4.1 Motorcycle Battery Voltage Chart
| Motorcycle Battery Voltage Chart | ||
|---|---|---|
| Battery Charge Percentage | Voltage Level | Battery Status |
| 100% | 12.75-13.3 V | Fully charged |
| 90% | 12.6-12.7 V | Charge the battery before you go for a ride |
| 80% | 12.5-12.6 V | |
| 70% | 12.45-12.5 V | |
| 60% | 12.35-12.45 V | Poorly charged |
| 50% | 12.25-12.35 V | |
| 40% | 12.15-12.25 V | |
| 30% | 12.05-12.15 V | The charge is dangerously low, indicating a damaged battery |
| 20% | 11.8-12.05 V | You are possibly having a dead battery at this level |
| 10% | Below 11.8 V | |
- If the voltage reading is between 12.75 and 13.3 V, your battery is in perfect condition.
- Meanwhile, if the multimeter shows a reading of 12.5 V and below, there must be something wrong with your motorcycle battery or it is poorly charged.
- If it is below 12, then your motorcycle battery is soon about to die.
4.2 How to Decide Whether to Recharge or Replace a Motorcycle Battery
Now, to test the condition and health of the battery whether it only needs recharging or should you replace it, we will perform further tests.
If the reading is below 12.5 V after checking the voltage of the battery, we will need to charge the motorcycle battery first and see if it holds the charge or not.
4.3 Charge the Battery
If your motorcycle battery is undercharged, you can charge it using several ways, including:
Charging the battery using a battery charger
Jump-starting the battery
Push-starting the battery
To learn in detail, read the attached article for a step-by-step guide to charging your motorcycle battery.
Recommended Article: HOW TO CHARGE A MOTORCYCLE BATTERY
Note: Make sure the battery is fully charged and after the charging is done, wait for at least half an hour for the charge to settle. The ability to keep the charge stored for a longer duration is what a bad or dead battery cannot do.
4.4 Check the Battery’s Voltage Again with the Multimeter
Perform the same procedure mentioned above to check the battery’s voltage using a multimeter.
If the motorcycle’s battery is unable to hold the charge and drops below 12.5 V , your battery has gone bad or is probably dead . It is time to replace the battery .
- If it stays above 12.75 V and holds the charge, your battery is good and the problem is somewhere else if your motorcycle is still not starting. It can be a faulty charging system that is not letting your motorcycle start.
5. How to Load Test a Motorcycle Battery
The load/cranking voltage test is performed to test the battery’s behavior when the current is drawn. It is as simple and easy as the previous test which was carried out when the motorcycle was in the ‘Off’ state.
To perform the load/cranking voltage test, ensure the battery is fully charged.
Connect the multimeter’s test probes with the respective terminals of the battery (The red probe with the positive terminal and the black probe with the negative terminal of the battery).
Set the multimeter’s knob to the same DC V setting.
Switch on the motorcycle’s ignition switch.
Turn the engine on using the starter button.
Observe the voltage reading.
The voltage will fluctuate somewhere around 10 V.
If the voltage drops below 9.5 V, then your battery is dead.
You need to replace your motorcycle battery.
Based on the load/cranking voltage test results, we can reach the following two conclusions about the battery:
| Load Test/Cranking Voltage Test Results | ||
|---|---|---|
| Voltage Level | Indication | Outcome |
| 9.5-10.5 V |
 Battery is Good |
Keep using the battery |
| Below 9.5 V |
 Battery is Dead |
Replace the battery |
6. Troubleshoot
After carrying out the tests and reaching a conclusion, you are clear about the issue. Your battery is either in good condition or has gone bad, depending on the test results. If your motorcycle battery has failed the tests, you must consider replacing the battery to avoid getting stranded in the middle of nowhere where it is hard to find any help.
If your battery is undercharged and only requires charging, recharge it as soon as possible. You can keep the portable motorcycle battery charger with you to charge the battery.
If your motorcycle battery has gone bad and is dead, i.e. the charge keeps dropping on its own after a few minutes of recharging, replace the battery.
Note: One thing that you must consider while testing your motorcycle battery is to locate the main issue if it is not the battery. Get to the root cause of the problem. It can either be the stator, electrical system, wiring, switches, relays, and solenoids. If there are issues with any of the mentioned equipment, installing a new motorcycle battery is not a wise decision before fixing the root cause.
7. Takeaway – Get the Maximum Out of Your Motorcycle Battery
Getting the maximum out of your motorcycle battery and making it last longer is what you should aim for as a rider. Like other essential motorcycle parts including the engine, transmission, clutch, and suspensions require attention and care, you should treat your motorcycle battery the same way. There are certain ways through which you can improve the life of your motorcycle battery:
Always keep your motorcycle battery fully charged.
Never let the battery drain below a certain level or completely discharge it.
Do not let the motorcycle stay inactive for longer periods.
Even if you have to store your motorcycle for a longer period, keep idling your bike now and then to ensure the system does not jam.
Another way to save your battery from dying if you want to store your motorbike for a longer period is to disconnect the battery terminals.
Maintain the charge of your battery when not in use.
Keep the battery clean from dust, debris, and moisture.
Do not overcharge the battery to avoid swelling and overheating.
Keep the battery terminals clean.
Keep checking your motorcycle battery’s fluid level.
The most frustrating moment for a motorcyclist is to get stuck with his motorbike in the middle of nowhere where there are no signs of help. If you are a trained and eligible rider, you must be self-sufficient and should carry useful tools and equipment with you at all times during the ride. To make your motorbike capable of storing and carrying essential items, Viking Bags has tons of luggage bag options at its online store. You can choose from saddlebags , fork/tool bags , sissy bar bags , tank bags , backpacks , tour packs , handlebar bags , and much more.
Popular Collections


Leave a comment
All comments are moderated before being published.
This site is protected by hCaptcha and the hCaptcha Privacy Policy and Terms of Service apply.