Table of Content
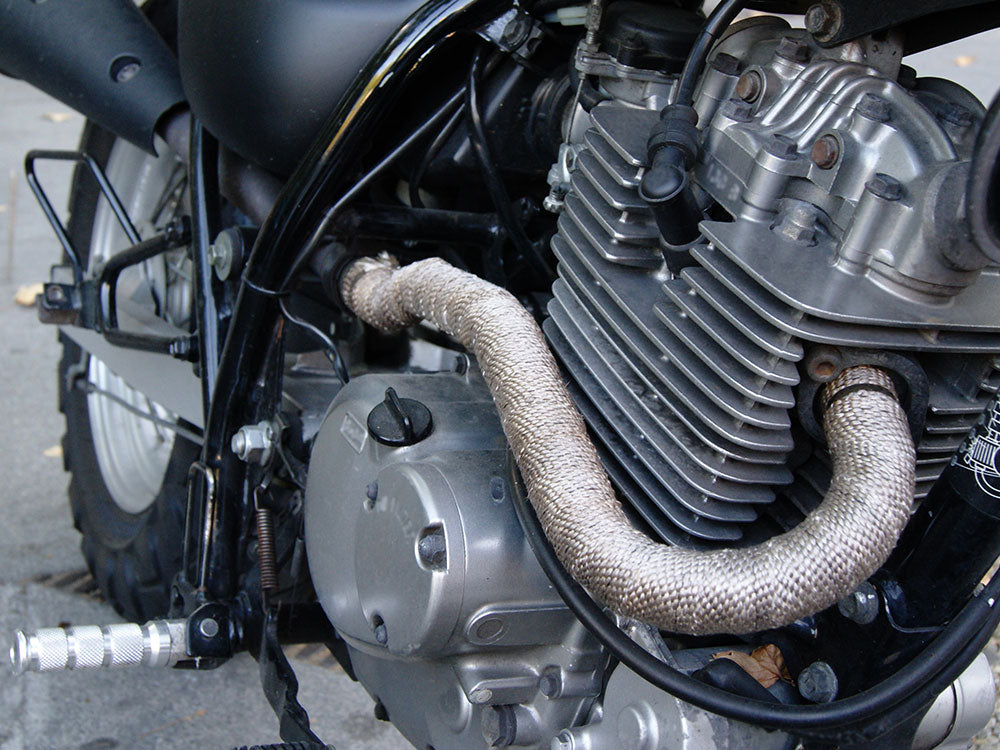
Heat wrapping a motorcycle exhaust is a common modification custom builders apply to protect the engine and the rider’s legs and feet from excess heat while riding. Heat wrapping can also improve your ride’s custom look and performance. It is an easy process that requires little preparation. Continue reading this article to learn how to heat wrap a motorcycle exhaust.
1. Does a Motorcycle Exhaust Wrap Improve the Engine’s Performance?

A motorcycle exhaust heat wrap does improve the motorcycle’s engine and performance by adding an extra insulation layer on the exhaust pipe. The heat wrap keeps the heat in the exhaust, ensuring gasses leave the muffler at high speeds. The high-speed exhaust gasses improve air intake and combustion in the engine, resulting in better performance and higher power output. However, the increase in the engine’s power and performance is usually minimal.
2. Different Types of Heat Wraps
Motorcycle exhaust heat wraps usually come in two different sizes: one- and two-inch heat wraps. If you want a tighter wrap that overlaps often, the one-inch heat wrap’s thickness is the best option. However, due to excessive overlapping, more heat wrap is required to cover the surface area and can be more expensive. Meanwhile, most motorcyclists use two-inch heat wraps because they cover more surface area and are easier to install.
3. Equipment Required to Heat Wrap Motorcycle Exhaust Pipes
| Equipment Required to Heat Wrap Motorcycle Exhaust Pipes |
|---|
| Heat wrap |
| WD-40 |
| Scissors |
| Stainless steel cable ties |
| Hose clamps |
| Cold water |
| Gloves |
| Silicone spray paint |
| Pieces of cloth |
| Sheet |
4. How to Heat Wrap A Motorcycle Exhaust
4.1 Remove the Exhaust Pipe
It can be difficult to remove an exhaust pipe from your motorcycle due to the accumulated rust and dust. Make sure to wear gloves before you start working. Apply WD-40 to remove the rust from the engine headers’ studs. After you wait for the lubricant to settle, you can remove the exhaust pipe with ease. If there are heat shields and engine guards installed on a motorcycle, make sure to remove them first before removing the exhaust pipe.
4.2 Prepare the Exhaust Pipe
Detach the exhaust pipe without scratching it and place it on the sheet. If there is a burn on the exhaust pipe, remove them before applying the heat wrap.
4.3 Start from the Rear End of the Exhaust Pipe
Start heat wrapping the exhaust pipe from the rear end to the exhaust headers. This will leave no openings for dust, debris, and water to enter the exhaust pipe.
4.4 Soak the Motorcycle Exhaust Heat Wrap in Cold Water
Take the motorcycle exhaust heat wrap out of its packaging and soak the wrap roll in cold water in a bucket or sink. Make sure the heat wrap is completely soaked.
4.5 Mount the Exhaust Pipe Using a Soft Clamp
To wrap the motorcycle exhaust pipe, make sure to firmly mount it on soft clamps to avoid scratching. You can also ask another person to hold the exhaust pipe if you do not have clamps.
4.6 Tie the Heat Wrap in Place Using a Stainless Steel Cable Tie

When you start wrapping, use the stainless steel cable tie or a large hose clamp on the first turn to hold it in place.
4.7 Start Wrapping the Exhaust Pipe
Start to wrap the exhaust pipe and overlap at least a quarter of an inch. Also, wrap it tightly and pressed it close to the pipe for better insulation. While wrapping the curved part of the exhaust pipe, increase the overlap by more than half an inch to ensure the curve is completely covered.
4.8 Tie the Exhaust Header’s Side of the Heat Wrap Using a Cable Tie
When you have finished wrapping, cut the heat wrap with scissors. Overlap the last two wraps and tie the ends using a stainless steel cable tie.
4.9 Wrap the Other Exhaust Pipe by Following the Same Procedure
Most motorcycles are fitted with V-Twin engines and dual exhaust pipes. Wrap the other exhaust pipe by following the same procedure.
4.10 Reinstall the Wrapped Exhaust Pipes
Reinstall the wrapped exhaust pipe. Turn on the motorcycle and start twisting the throttle. You will see clouds of smoke coming out of the wrapped exhaust pipe. The heat produced will burn the starch in the fibers which is a part of the process. As the starch burns, the heat wrap will tighten. The smoke produced is not toxic and will stop in 10 minutes.
4.11 Remove the Wrapped Exhaust Pipe Again For the Paint Job
After the heat wrap is completely dried, you can remove it again and cover the wrapped exhaust pipe with silicon spray paint. This is optional for riders who want to change their motorcycle’s aesthetics.
4.12 Reinstall the Heat-Wrapped Exhaust Pipe
Let the paint dry and then reinstall the exhaust pipe. Make sure that all the bolts are tightened and the stainless steel cable ties are in place.
5. Pros and Cons of Motorcycle Exhaust Heat Wrap
| Pros of Motorcycle Exhaust Heat Wrap | Cons of Motorcycle Exhaust Heat Wrap |
|---|---|
| Provides a custom look | Does not last long |
| Protects the rider’s legs and feet from burning | Requires rewrapping |
| Used to cover up dents | Color fades |
| Used to cover up the rust | Premature exhaust wear due to excessive heat |
| Improves the engine performance | Can trap dirt and moisture |
6. Frequently Asked Questions (FAQs)
6.1 What Are Motorcycle Exhaust Heat Wraps Made of?
The most common type of motorcycle exhaust heat wraps available in the market are made of fiberglass composite. Some heat wraps are labeled as titanium but are actually made of crushed volcanic rock.
6.2 Can Exhaust Shields Be Used in Place of Heat Wraps?
Exhaust shields can be used in place of heat wraps to protect the engine and your legs and feet from excess heat. However, this will result in an increase in the size and weight of the motorcycle exhaust pipes. Meanwhile, the motorcycle exhaust heat wraps provide better insulation and do not add much extra weight to the exhaust pipes.
6.3 How Much Does Heat Wrapping a Motorcycle Exhaust Pipe Cost?
The cost depends on the size and the number of exhaust pipes installed on your motorcycle. It also depends on which brand, what type of heat wrap you use, and what is included in the heat wrap kit. A motorcycle exhaust heat wrap can cost from $20 to $150.
6.4 How Long Does Motorcycle Exhaust Heat Wrap Last?
It is difficult to tell how long motorcycle exhaust heat wrap lasts as it depends on various factors, including:
- Motorcycle storage location
- Conditions of the storage location
- Quality of the applied heat wrap
- Riding conditions
- Road terrain
- Weather
- Conditions of the exhaust
7. Final Words
Motorcycle exhaust pipes channel the released exhaust gasses from the engine and can withstand high temperatures. Because the exhaust pipes release hot gasses from the engine, they can quickly become hot and burn any material that they come in contact with. To protect your legs and feet from getting burned, motorcycle exhaust pipes can be insulated using heat wraps. Motorcycle exhaust heat wraps improve safety and give your motorcycle a custom look. Heat wrapping a motorcycle exhaust pipe is an easy process, though it helps to have a friend with you to avoid damage to the exhaust pipes.
If you are a fan of the custom motorcycle looks, you can also customize your motorcycle by installing aftermarket parts available at Viking Bags. You can improve aesthetics, safety, and comfort by installing sissy bars, fairings, crash bars, sissy bar pads, handlebars, and custom seats. If you want to use your motorcycle for long-distance rides, you can also find several luggage options available at Viking Bags, including saddlebags, sissy bar bags, and handlebar bags.


Leave a comment
All comments are moderated before being published.
This site is protected by hCaptcha and the hCaptcha Privacy Policy and Terms of Service apply.