
- Table of Contents
- 1. Motorcycle Hand Signals Guide for Newbie Riders
- 1.1 Right Turn
- 1.2 Left Turn
- 1.3 Stop
- 1.4 Follow Me
- 1.5 Speed Up
- 1.6 Slow Down
- 1.7 You Lead/Come
- 1.8 Road Hazard
- 1.9 Turn Signal On
- 1.10 Comfort Stop
- 1.11 Single File
- 1.12 Double File
- 1.13 Refreshment Stop
- 1.14 Police Ahead
- 1.15 Pull Off
- 1.16 Fuel Stop
- 2. Final Thoughts
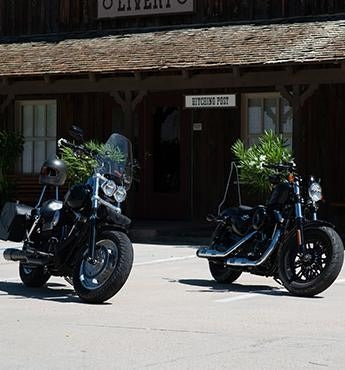
1. Motorcycle Hand Signals Guide for Newbie Riders
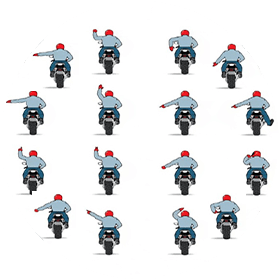
You might have noticed some motorcycle riders doing some tricks with their hands while riding in groups. Well, those hand tricks are really useful and proved practical in almost every turn of motorcycle riding experience.
There are the motorcycle hand signals that professional riders use to indicate to each other about the upcoming difficulties or what they are going to do in the next few moments. However, there is no instrument cluster given at the back end of the motorcycles, and communication through hand signals is a cool and easy way to stay intact and alert with each other’s actions.
Although these signals are a basic part of the motorcycle driver's license test riders tend to forget them due to their less use in daily basis riding. Here in this article, we’ll recall those motorcycle hand signals together so that we could use them next time we go on a ride.
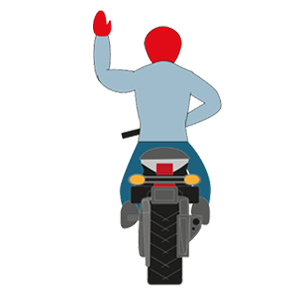
1.1 Right Turn:
This gesture works as your turn signal and lets your group know you are turning right. This signal is usually used to lead or to break from the group, depending on your status in the group, whether you are leading or following. To gesture, turn your elbow 90 degrees, then point your clenched fist at the sky to complete the signal.
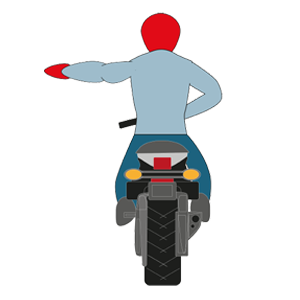
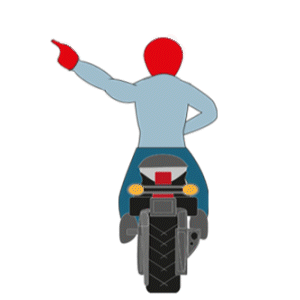
1.2 Left Turn:
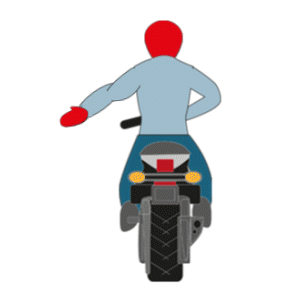
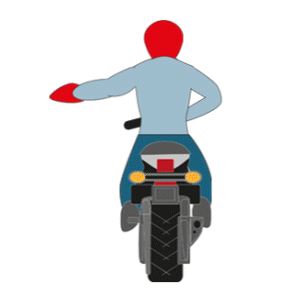
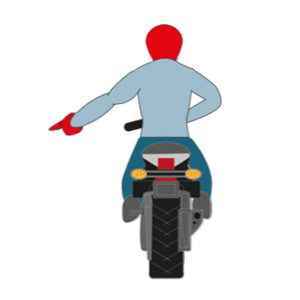
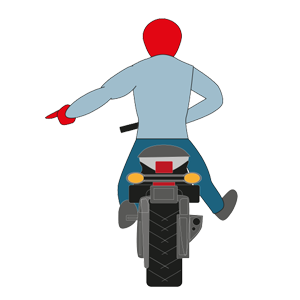
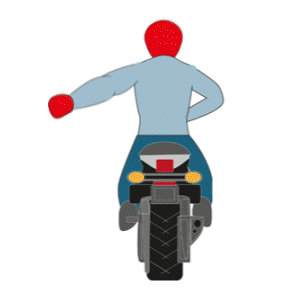
This gesture also works as your turn signal and lets your group know you are turning left. The signal can be used to break from or lead the group, depending on your status in the group, whether you are leading or following. To make the signal, extend your left arm straight out with your palm facing down.
1.3 Stop:
When the group leader issues the "stop" signal, it should set off a chain reaction that extends all the way back to the group's last rider. To make the signal, bend your arm at 90 degrees, keep your palm open, and point your fingers down at the road.
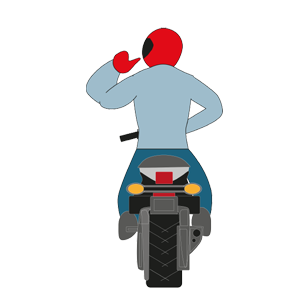
1.4 Follow Me:
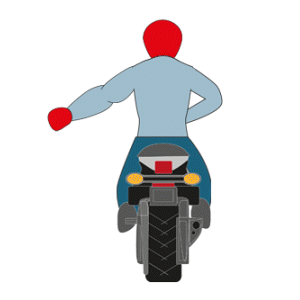
Used by any of the group members, probably the first one to announce a new, often self-appointed group leader. The signal is also used to segment a large group into small groups. To make the signal, extend your arm forward at the shoulder with your palm facing outward.
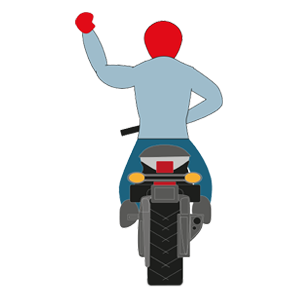
1.5 Speed Up:
This motorcycle signal benefits the most to the inexperienced groups. Experienced groups usually rely on body language. This signal is used to tell the other group members to match your pace by increasing their speed. To make the signal, extend your arm and swing your palm in an upward direction to give the signal.
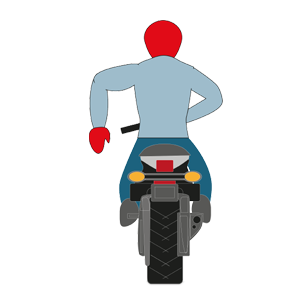
1.6 Slow Down:
Usually, motorcycles generate intense engine-braking forces that do not activate the rear-facing brake light. The signal is useful to inform the group members to slow down under such circumstances. To make the signal, extend your arm and swing your palm down toward the road to tell everyone in the group to slow down.
1.7 You Lead/Come:
Also known as the “You! Follow Me” signal. It has two distinct parts. It consists of two distinct parts. Start by pulling up alongside the rider you want to lead or follow. Point at their bike and then swing your arm forward in one motion. Repeat this motion until the riders behind you understand.
1.8 Road Hazard:
This is also known as a “2 in 1” signal. The gesture is different depending on whether the hazard is to the right or the left. Point with your left arm at the hazard on the left. Use your right foot to point if the hazard is on the right.
1.9 Turn Signal On:
Alternate between extending your fingers and making a fist to make a "blinking" gesture with your left hand. Use this signal to alert another rider that he forgot to turn off his blinker, letting him save face at the next rest or refreshment stop.
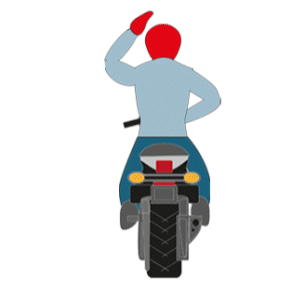
1.10 Comfort Stop:
Poke your arm out to the left and shake your fist using a short, up-and-down motion – as though shaking a can of paint. Make this stop only when the road and shoulder are debris-free and there is ample room to pull over.
1.11 Single File:
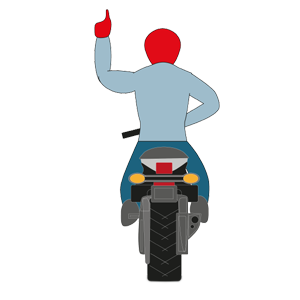
It is an easy gesture but has full meaning. Point out your left index finger and bend your arm up to the sky. In other words, act like the rider behind you is asking “How many?” and you are replying by gesturing with your left pointer finger.
1.12 Double File:
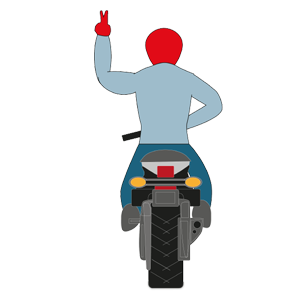
The signal is used on wider roadways to let your fellow riders know to ride in a staggered formation within the lanes of the highway. Bend your left arm at the elbow and point your index and middle fingers to the sky. Do not forget to add your index finger.
1.13 Refreshment Stop:
The signal is used to indicate the rider’s intentions to stop at a restaurant or gas station. Make a "thumbs up" gesture with your left hand, pointing to your mouth (or the front of your helmet), as if your thumb were a straw poking up from a glass of water.
1.14 Police Ahead:
To let your fellow riders know about the police activity ahead, start patting the top of your helmet with your left palm. Keep our police officers and other first responders safe in our communities. Use caution and respect all the motorcycle laws.
1.15 Pull Off:
Tell the rest of the group to exit the highway, either right away or at the next exit. When a halt is made for reasons other than comfort or refreshment, the pull-off signal is provided.

1.16 Fuel Stop:
While riding with your group, running out of gas will earn you a nickname you probably won’t like. By pointing your left index finger at your petrol tank, you may communicate your need to refuel.
2. Final Thoughts
Motorcycle hand signals are practical in many ways, but they also make riding even more fun. For that, every rider should know them. However, beginner riders need practice to perform these gestures well. The best way to practice them is to always revise the signals in front of your group before you leave for riding.
Moreover, always ride wearing complete motorcycle gear, or if you are planning to go on a motorcycle camping trip , make sure you are carrying all the essentials in your motorcycle saddlebags .
Featured Products

Motorcycle Saddlebags

Harley Motorcycle Trunks

Sportster Sissy Bars

Motorcycle Luggage Bags
Softail Seats

Motorcycle Parts


Leave a comment
All comments are moderated before being published.
This site is protected by reCAPTCHA and the Google Privacy Policy and Terms of Service apply.